This first article will cover my home setup for backing up data from our household. My data backup follows a simple principle: 3-2-1.
You may ask: “Why should I bother backing up my data? I’ve never lost anything yet. Anyways, my data is not that important.”
Two fundamental flaws lie in this statement. The first mistake concerns the word “yet”. Hard disk lifespan depends on many factors, such as the environment (temperature, dust), brand / quality as well as the actual usage. Although some drives may survive for 10+ years, some drives can already fail after only few weeks of usage (source). So it’s not a question of whether, but rather when your data will get lost if you don’t have an appropriate backup solution.
The second flaw lies in thinking that you don’t have anything important. In today’s world, it’s almost impossible to not rely on data to a great extent, be it for tax declarations, saving digital contracts of your home, or keeping photos of your loved ones.
Apart from drive failure, HDD data can also be lost or corrupted due to bitrot, denoting the spontaneous corruption of data on a seemingly working drive, making the corrupted data effectively useless (see box below).
Imagine: It’s your daughters 18th birthday and you want to make a slideshow with pictures of her as a kid but the external hard disk on which you keep all your data is rotten (see bitrot info box above). You will be desperate and your only way of getting the data will be through a costly data rescue expert, who might not even be able to retrieve all of your lost data. This happened to Tony Northrup, a photographer and tech expert who has written over 30 books on IT.
What is the solution to this? Elaborate a data backup solution using the simple 3-2-1 approach.
Here is a simplified schema of 3-2-1:

What does this mean?
First, you keep 3 copies of all of your data. For data which you use regularly, one copy will be your working files. The other two data copies will be for backup.
Second, have the data copies on at least 2 separate drives. I actually once dropped a hard drive from about 40 cm above the ground and it died. Also, as seen above, hard drives have a limited lifespan of only a few years.
Last, one of the copies should be at a different place, in case your house burns down (I hope that never happens).
Sounds easy, right? So let’s look at how I implemented this at my home.
When I bought my first camera and started shooting, I realised that I’d quickly need a solution for offloading the massive amounts of data produced by my photography projects. I started off by buying a very simple network-attached storage (NAS), which is kind of a hard drive mounted to your local network. There are several benefits of this over a simple external hard drive, however, for me, the main purpose of this was to have a storage solution with ample capacity which I could access from anywhere, anytime. My first NAS was a «WD My Cloud Mirror Gen 2» (short «WD My Cloud» thereafter) with two 3-terabyte HDDs (hard-drive disks), giving me 6 terabytes of HDD storage, of which I could use 3 TB, as I used a so-called RAID-1 setup. This means writing all data on both drives. RAID stands for Redundant Array of Independent Disks and designates various computer science concepts for distributing data across disks, using concepts such as mirroring or striping (more on this can be found on Wikipedia if you’re interested). Fortunately, with an end consumer solution such as the WD My Cloud, you don’t need to worry about the implementation, you just need to select the RAID scheme and the NAS does it all for you.
With the RAID-1 setup on my first NAS, the WD My Cloud, if one hard drive failed, I could buy a new disk and copy the data over from the remaining disk. While this approach fully satisfied KISS (Keep it Simple & Stupid), it did not satisfy all of the 3-2-1 rules:
With time, my photography ambitions grew and I decided to upgrade to a more professional storage solution. After some research, I decided to get a Synology NAS. A few advantages of the Synology NAS over the old WD My Cloud NAS are:
My current home NAS setup is shown in the picture below:
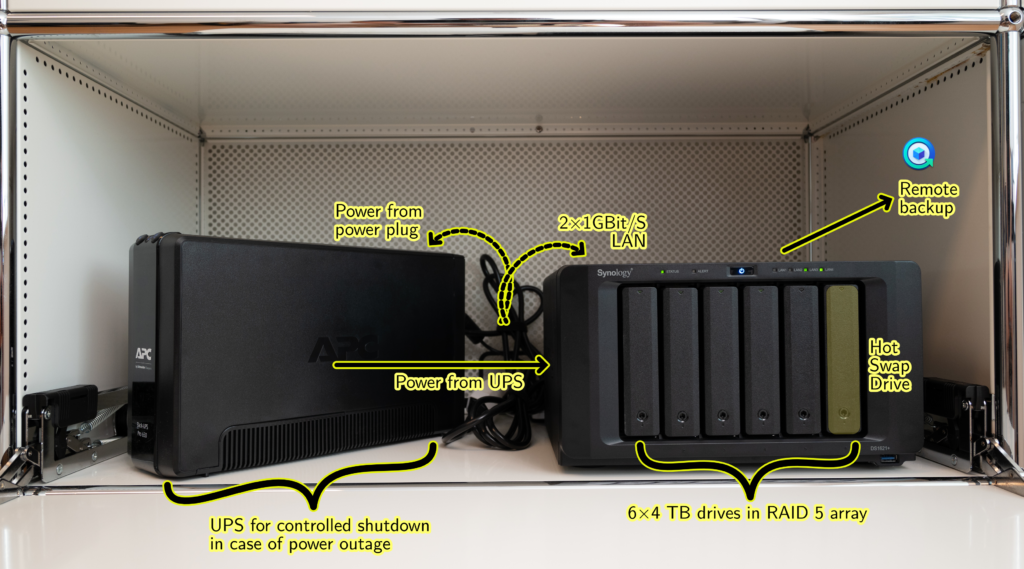
A few details:
Please let me know in the comments what you think of my data backup solution and of this new blog format in general. Please also let me know if you have suggestions for upcoming blog posts!